New addition to my Fleet! April 8, 2010
Posted by greggk9 in Site news.add a comment
18/6/10
PT 596 has been updated with the latest info on its construction.
16/6/10.
I have just updated the sun tug build with info on the installation of the rudder and propeller shaft, along with the addition of yet another boat build, A Rhine pusher tug, so the site is getting more items to tempt you all with [I hope]. Please feel free to drop me a message, let me know your comments and ideas too.
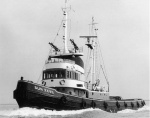
I have just recieved delivery of my latest aquisition. Another tug, but this time its in real big kit version! Its a “Sun XXI Tug”, made by a company called “Lesro models”, based here in the UK. No its not a “new kit” as such, Ive purchased it secondhand via ebay. It had belonged to a keen boat moddeler, but unfortunately has passed on before he got round to building this kit, So I managed to secure it for a reasonable price, so now in my collection so to speak.
the kit came virtually complete, barring for the build instructions were missing, presumed they were taken out to study and take notes from, but were lost somewhere. never mind, a short request note on the “modeltugforum.com” and a kind forum member, namely Bill Saunders has kindly photocopied his own set of instructions and posted them to me, fantastically arriving same day as the tug kit did, hows that for timing!
Bill also kindly has sent me a cd rom disc containing all the pictures he has taken of his own Sun Tug build [so far], so with his kind assistance, I should be able to construct this with ease.
So, you will find [yet another] blog page being inserted, so I can add/update the blog build for this tug too. I will be altering this boat a little, so if you look at the pictures below, you will see the B/W picture depicts a Sun tug with fire monitors, this is what mine will grow in to [hopefully].
Bill !, many thanks for your assistance, it is and will be greatly appreciated, I just hope your first sailing goes well and you suffer no problems.


Propellor shafts. March 20, 2010
Posted by greggk9 in PT 596.Tags: PT596
add a comment
I am writing these updates a little “out of sync”, but the end result is still the same, But whilst i was waiting for the prop shafts, propellers and rudder kits to arrive, I carried on and built the upper deck works ans treated a lot of things to some paint [more of which to follow].
So, 3 motors, 3 propellor shafts, 3 rudders. Thats the criteria I wanted and I also wanted it to look authentic with 3 props, rather than some “lame game” running single propellor power.
I am using graupner speed 400 motors, with “PT boat” open prop shafts and prop shaft supports [with bearings] and of course, 3 rudders.
The propshafts and brass propellers were sourced through a local company to myself called “SHG Model supplies”, they also supplied the rudder kits and a bit of advice too as they were responsible for supplying the “model boat magazine” with the drive items when they did a magazine spread back in December 2007, So I knew at least I was using the right kit of bits so to speak.
I wanted to keep the prop shafts looking right and didn’t want them to stand too low below the hull to spoil its appearance when out of the water [on display], So spent several hours deciding on a plan of attack to ensure my designs were going to plan. I firstly mounted the rudder pivot tubes, as this gives me the “end point” for where the tip of the propellers will have to sit. the set about converting the prop shaft supports I have purchased from ” N M Models”. these were white metal items so fairly soft to drill and cut [please be wary of this it caught me out using too low a drill speed]. I sourced some brass bushes for the prop shafts [ 2mm dia] as the prop shaft supports were drilled to 5mm diameter [internally] and being as my outer propellor shafts didn’t run all the way to the propellor blades, I had to make some decent supports up that would not damage the shafts or cause them to bind. These were purchased from a model train spares shop, as these brass bushes are used as “axle bushes” for 4mm scale trains ! perfect machine fit to the propellor shafts and after drilling a slight indent in to each end of the prop shaft supports, these brass bearings were glue bonded in with some superglue. Ensuring they were in alignment before the glue sets with a 2mm drill bit [ no, not the propellor shaft itself!].
I then cut down the outer lower support mount of the propshaft supports, to allow me to get the preferred ride height for the propellers I wanted before bonding the 2 outer shafts to the hull, via the propellor shaft supports [only] for now. this is a temporary bond, as I will be using stabilit express to make the full bond, now I know all is in alignment, but being as this glue is both expensive and you only have a few minutes to use before it starts to set, I much prefer to “tack in place” first.
My next job will to be to install the inner propellor shaft and supports, then i will glue bond all 3 in fully. next task will be to shape the 3 rudder faces and get their profiles correct before attaching the rudder control horns and servo.


Control cabin/wheelhouse. March 19, 2010
Posted by greggk9 in SHG Tug " Bruno".Tags: SHG tug
add a comment
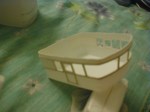
Ive decided to add some detail to the wheelhouse, rather than simply paint some black patches on where the windows should be. the boat is within scale enough to be of a size its easy enough to scratch build, so will do it, even if for my own peace of mind.
I’ve scored out the glazing panels, used microstrip [plastic] to form the windo and door frames, then used some tinnted perspex glazing I’d got spare from the graupnerJohann Fili kit. it looks good and realistic, but before I glue down the roof, I will add the steering position and control desk, as well as ensuring I leave room to route the cables through for the signal lights and mast light. These will be “led” items so not to waste the battery capacity too much.
I have also made a support/swing frame for the rear towing hook hawse, again to add some better/finer detail as I will be constructing a barge to use as a “tow” and may even make the barge multipurpose by cutting out the stren with a “bow profile” so I then have the choice of either towing or using the barge as a “pusher”. Well how often to you just see a tug off on its own, its either tied up at the dock or hard at work doing something, so I’m not just going to sail a non working tug round my pool. [ha ha]


SHG Tug Arrival ! March 16, 2010
Posted by greggk9 in General news update, SHG Tug " Bruno", Uncategorized.add a comment
Finally recieved my tug boat from SHG. Seems as if they had problems with royal mail, as no signed for sticker was put on the parcel, so the parcel was delivered second class not first, so took twice as long to arrive.
Anyway, on opening the box, the mouldings/ sorry vac forms are all good, fairly detailled albeit the moulds could probably do with a change due to pressing volumes, they have worn and lost trim cut lines in places, but hey, for the money, im not complaining.
More of this will be posted on its own page from now, so dont forget to check its page out in my blog.
New addition to fleet March 9, 2010
Posted by greggk9 in General news update.Tags: site update
add a comment
I have yet another boat, this time is a brand new kit. I had intended it to become the daughter boat for my DGzRs lifeboat, but it wasn’t untill I opened the box today I found out that it wont fit in the rear launch compartment of my boat! Unfortunatly the hull is too wide and too flat at the stern to make my launch ramp. So it will have to run as a lifeboat on its own.
The boat itself is a Graupner “Johann Fidi”, its a daughter boat for a Graupner Bremen class Lifeboat, But I didnt realise the difference in hull shapes [ no one tells you these things] Well not untill I had ordered it and it arrived.
So there will now be another page blog on here to cover this build.
I still dont have any update on my tug boat yet, still waiting for SHG to manufacture a kit and ship to me! 3 weeks and counting, cant be good for business for them.![The Kit [opened].](https://myrcmodelboatsite.files.wordpress.com/2010/03/p10100012.jpg "P1010001")
Hello world! March 5, 2010
Posted by greggk9 in Site news.Tags: daughter lifeboat, Fireboat, Graupner Lifeboat, laser speedboat, picture update, PT596, SHG tug, site update
add a comment
Welcome to my Blog Site. I hope you may find a few interesting things on here that may be of use to you and your own model boats.
I’m no expert but a keen amateur who simply would like to share their building experiences with you all.
Please feel free to send in your comments or hints and tips and if you are keen enough, I will post them on here for you to see and for others to read too.
